
Learn to draw a car with our tutorial. From learning proportions to adding detail and shading, become a master at creating realistic car illustrations.
In this tutorial we will learn step by step how to create realistic and attractive car images. You’ll learn how to properly proportion and detail the body, wheels, and other elements to make your drawing come to life on paper. Get your pencils ready and let’s begin this exciting car drawing tutorial!

How to Draw a Car: Introduction
Drawing cars can be a challenging task, especially if you want to create a realistic image. However, by following our helpful tips and steps of this tutorial on how to draw a car, you can achieve professional results.
The first step is to learn the anatomy of a car. Understanding basic shapes and proportions will help you create a more realistic image.
We will show you how to draw a car using the Audi A8 as an example, but using the eleven simple steps from this lesson, you can easily draw a car of any other brand.
Light and shadow play an important role in creating volume and realism. In the last steps we will show how the light hits the car and creates shadows. Pay attention to the lighting and reflections on the car’s surfaces. Use different gradations of shadows to create three-dimensional shapes.
When you start drawing, use light and sketchy strokes to define the overall shape of the car. Then add more detailed strokes to express features and details. Work gradually to achieve the desired result.
In order to draw a car using our drawing tutorial, you will need the simplest set of an artist, consisting of a pencil, paper, and eraser.
Step-by-Step Car Drawing Tutorial
Time needed: 1 hour
How to Draw a Car
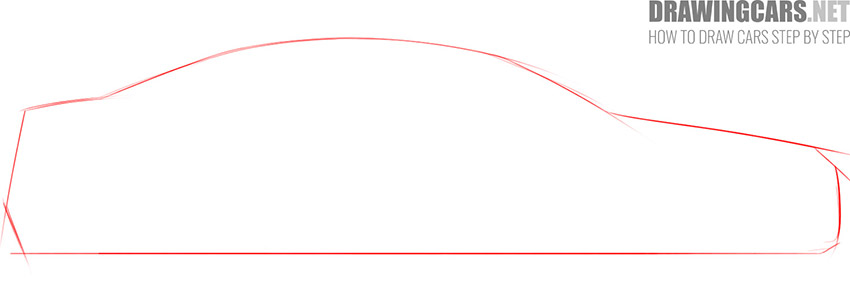
- Draw the general outlines of the car
Start by sketching out the outlines of the body using very light lines. Mark the location of the roof, hood, and trunk with very rough strokes.
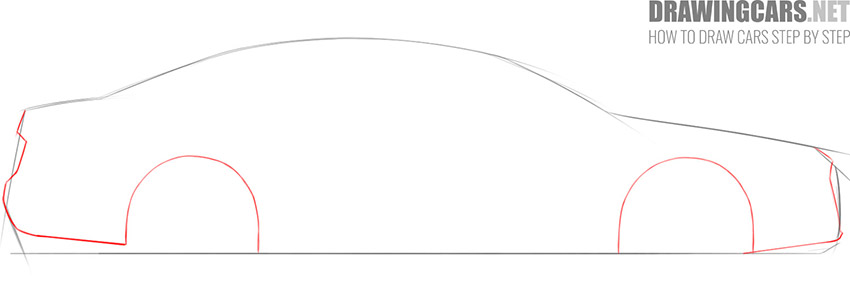
- Detail the outline of the body
Draw the outlines of the front and rear bumpers, as well as the wheel arches. In our example, these arches are semicircular, but you can give them a different shape.
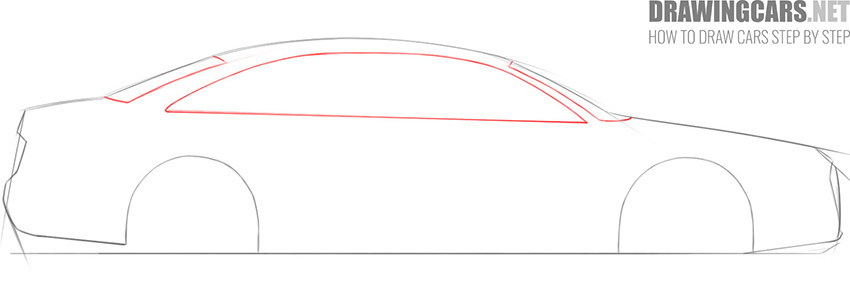
- Draw the windows
First, draw the rear window and windshields. Next, draw the side window frame with two long, flowing lines. The lines should be dark and crisp.
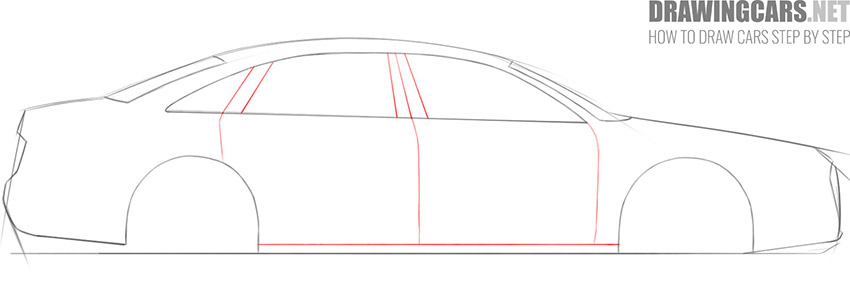
- Draw the doors
Start by sketching the lines of the windows. Next, continuing these lines draw the doors. The back and front doors are roughly the same sizes here.
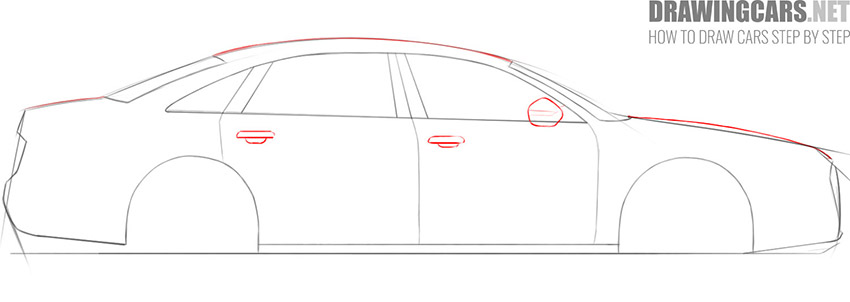
- Draw handles and a mirror
Draw handles just below the windows. They can have very different shapes in different cars. Then draw a rearview mirror and correct the outlines of the hood and trunk.
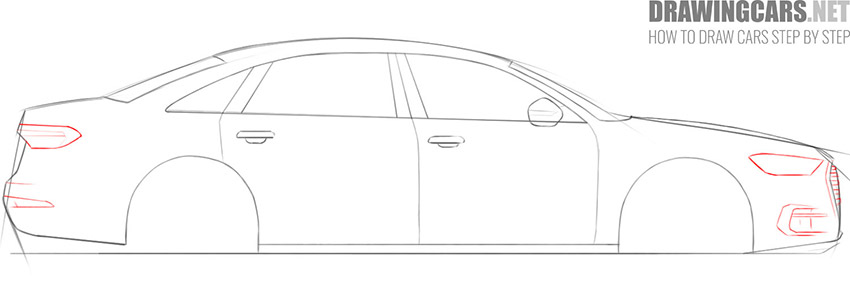
- Draw the headlights and tail lamps
Using clear lines draw the headlights and tail lamps as shown in our example. Next, sketch out the visible side of the radiator grille, the air intake, and the rear reflector.
- Erase the construction lines
When erasing the construction lines, be extremely careful not to erase the necessary lines. Add some decorative lines like in our example.

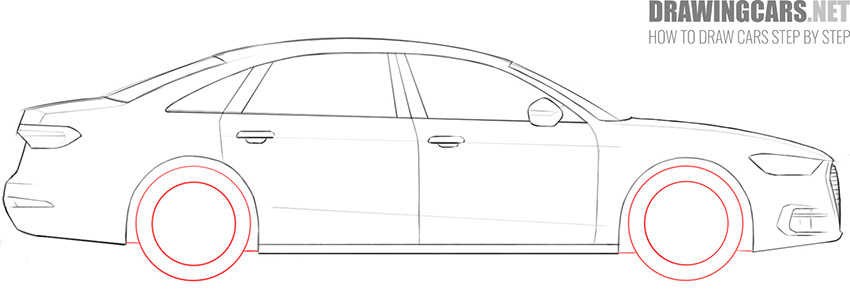
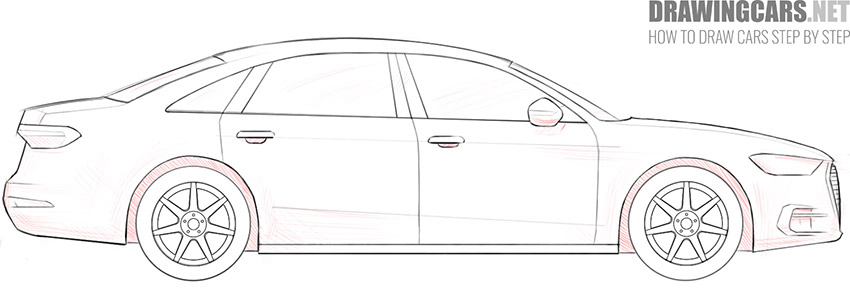
- Draw the wheels
In order not to make a mistake in drawing the wheels, and to check the correctness, sometimes look in the mirror at your car drawing. In the mirror image, you will see all the mistakes.
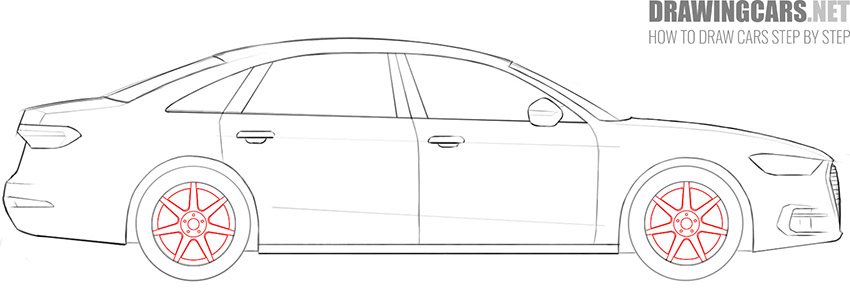
- Draw the rims
Similarly, when drawing rims, you can use a mirror to check your drawing and correct mistakes. By the way, rims come in many different types and shapes, so don’t limit yourself to inventing interesting patterns and shapes for your rims.
- Add shadows
Shadows should be applied using hatching of different directions and density. You can also paint your car drawing to make it look more lively and interesting.
- Car drawing completed
Check your drawing, compare it to our example. You can leave your car drawing as it is, or add some additional elements.


Car Drawing Lesson: Additional Instructions
Now let’s look at other options for drawing a car. Here we will try to give you different ways of how to draw a car, from simpler to slightly more complex.
How to Draw a Simple Car For Kids
Let’s start with the simplest option. Here we tried to use the simplest possible lines and did not use complex shading. In addition, at the end we colored the drawing of the car.
In the picture you see a passenger car with an open top. This is a two-seater with an emphasis on sporty looks. As usual, you will first draw the outer outline and gradually add the rest of the details.
All actions you can perform at a pace convenient for you. Try to draw the same lines as shown in the instructions and use small tips at each step of the drawing for the best results.

How to Draw a Chevrolet Car for Kids
Now let’s get started with another simple car drawing lesson for kids. Here we decided to choose a specific brand, that is, Chevrolet.
This car has an elongated body and a streamlined shape so that it can reach high speed. For coloring, you can choose the same color as in the example, or you can be creative and paint the car in any other color.
Carefully draw all the lines and remember all the drawing steps. You can apply the acquired skills in the future if you want to draw any other car model.

How to Draw a Simple Car for Beginners
It’s time to draw a slightly more complex machine. Here we will move from the childish style to a slightly more complex one.
We’ll be using a little more intricate detail, but we won’t be using shading, shading or coloring at the end.

How to Draw a Car for Beginners
This lesson is for slightly more advanced artists than the previous one. Here we will start drawing the car using even more details. On the one hand, this complicates the whole process a little, but on the other hand it makes your drawn car more realistic.

Car Step-by-Step Drawing Tutorial
So we got to a more advanced lesson in drawing a car. This method is very similar to the first one, but at the end we also don’t use shading.
The body of the car is low and has a streamlined shape, thanks to which the car looks very stylish. Such a car is able to reach high speed. The exterior design is very attractive and will appeal to any car enthusiast.
During the lesson, try to draw the same lines as shown in the example. Start drawing with larger elements, gradually adding details. Take your time in the process of work and be careful at each stage, so that in the end you get a great drawing.

How to Draw a Car: Summary
In this article, we covered the basic steps and techniques that will help you draw a car. We started by studying the shape and proportions of the car and then moved on to detailing the details and adding shadows and highlights to create a three-dimensional look.
It’s important to note that drawing a car requires patience, practice, and continuous improvement of your skills. Don’t worry if your first attempts don’t come out perfect. The more you practice, the better you become.
We also recommend examining photographs and actual vehicles for more details and features. This will help you capture realism and highlight the personality of each car you draw.
Don’t forget that drawing is a creative process and you can always add your own style and interpretation to your work. Practice, experiment and enjoy the process of creating unique and beautiful car paintings.
Leave a Reply